Helios Pro Industrial Laser Power Sensors
Helios Pro Industrial Laser Power Sensors
The Helios Pro measures high power industrial lasers of up to 12kW by measuring the energy of a short time exposure to this power.
- No water cooling, up to 12000W
- Profinet / EtherNet/IP / EtherCAT and RS232 interface
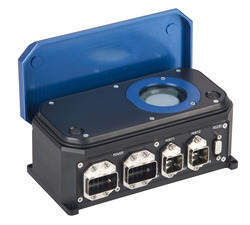
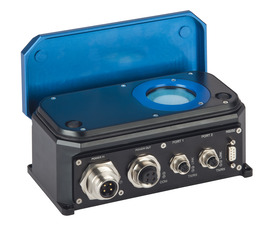
- Remote actuated protective cover
- Dual wavelength range NIR & visible spectrum
- Pulse characterization: power measurement independent of laser pulse rise time, stabilization of the pulse and pulse shape
- Optional Diffuser for small beam sizes See All Features
| Compare | Description | Drawings, CAD & Specs | Avail. | Price | ||
|---|---|---|---|---|---|---|
 | 7Z07146Helios Pro - ProfinetShort Exposure Laser Power Sensor, LP2, 100-12000 W, Ø50 mm, 450-550/900-1100 nm, Profinet | |||||
| 7Z07147Helios Pro - Profinet with DiffuserShort Exposure Laser Power Sensor, LP2, 100-12000 W, Ø35 mm, 450-550/940-1100 nm, Profinet with Diffuser | |||||
| 7Z07142Helios Pro - EtherNet/IPShort Exposure Laser Power Sensor, LP2, 100-12000 W, Ø50 mm, 450-550/900-1100 nm, EtherNet/IP | |||||
| 7Z07143Helios Pro - EtherNet/IP with DiffuserShort Exposure Laser Power Sensor, LP2, 100-12000 W, Ø35 mm, 450-550/940-1100 nm, EtherNet/IP with Diffuser | |||||
 | 7Z07140Helios Pro EtherNet/IP-MShort Exposure Laser Power Sensor, LP2, 100-12000 W, Ø50 mm, 450-550/900-1100 nm, EtherNet/IP-M | |||||
| 7Z07139Helios Pro EtherNet/IP-M with DiffuserShort Exposure Laser Power Sensor, LP2, 100-12000 W, Ø35 mm, 450-550/940-1100 nm, EtherNet/IP-M with Diffuser | |||||
| 7Z07144Helios Pro – EtherCATShort Exposure Laser Power Sensor, LP2, 100-12000 W, Ø50 mm, 450-550/900-1100 nm, EtherCAT | |||||
| 7Z07145Helios Pro – EtherCAT with DiffuserShort Exposure Laser Power Sensor, LP2, 100-12000 W, Ø35 mm, 450-550/940-1100 nm, EtherCAT with Diffuser |
Software
Helios Pro PC Application
Software: Helios Pro PC Application
Power measurement based on short exposure time.
Firmware: Firmware of sensor can be upgraded via Helios Pro PC application.
To download the firmware file go to: "Help/Firmware Upgrade" screen in Helios Pro PC Application.
For Helios Pro – Profinet:
Profinet Configuration File:
To install the Helios Pro into a Profinet network, download the GSDML.zip configuration file from the resource section below, and follow the instructions in the manual.
For Helios Pro – EtherNet/IP & Helios Pro – EtherNet/IP-M:
EtherNet/IP Configuration File:
To install the Helios Pro into a EtherNet/IP network, download the EDS.zip configuration file from the resource section below, and follow the instructions in the manual.
For Helios Pro – EtherCAT:
EtherCAT Configuration file:
To install the Helios Pro into a EtherCAT network, download the ECS.zip configuration file from the resource section below, and follow the instructions in the manual.
Specifications
- Spectral Range450-550 nm, 900-1100 nm
- Absorber TypeLP2
- Aperture SizeØ50 mm
- Minimum Power100 W
- Maximum Average Power12 kW
- Minimum Pulse Energy100 J
- Maximum Pulse Energy5 kJ
- Response Time3 s
- DimensionsOpen - 200 x 114 x 146 mm Closed - 200 x 103 x 86 mm (LxWxD)
- CE ComplianceYes
- UKCA ComplianceYes
- China RoHS ComplianceYes
Features
Introducing: "Helios Pro" Industrial Laser Power Meter Family
For measuring high power lasers in industrial settings, meet Ophir’s Helios Pro family. Designed with factory automation in mind, they have a robust, industrial design for harsh environments, and the range of communication interfaces make them easy to integrate into factory networks. Also Optimizing Li-Ion Battery Welding and Other High Power Laser Production Applications
Frequently Asked Questions
- How can the Helios Pro measure high powers without any water cooling?Answer
The key to Helios Pro’s ability to handle high powers with a small, uncooled body is the limit on exposure time. The specifications state a maximum “pulse” energy (i.e. energy during one exposure measurement) of 5kJ, so one can hit the Helios Pro with 12 kW (max power) for up to about 0.4 s for 1 measurement.
- How many measurements can be made in quick succession?Answer
This is limited by the temperature the Helios Pro body reaches, that is measured by an internal sensor. The temperature shouldn’t be allowed to exceed 60° C. In our experience, this translates to about 30 kJ of accumulated exposure. Of course, the longer one waits in between pulses (allowing the body to cool), the more total energy it can take. That is why the temperature sensor should be used as the primary indicator of overheating, while 30 kJ should be treated as a rule of thumb.
- How can the Helios Pro measure laser exposures of less than a second, if its response time is 2.5s?Answer
The 2.5s response time of the Helios Pro would indeed be problematic if it were measuring the power directly. In actuality it integrates the power received to measure the energy of the pulse. An internal photodiode is used to detect the pulse width. The power is then calculated by P = E / Δt.
- How do I install the Helios Pro? What connectors and cables does it use?Answer
Basic use with Profinet, EtherNet/IP or EtherCAT requires one power supply cable and one data cable. Using RS232 or the PC application requires one power supply cable and one RS232 cable. If you want to use the Helios Pro in a line/star topology, where it is daisy-chained with the next device in line, then you should use two power supply cables and two data cables.
Cables supplied with the Helios Pro are as follows:
Model: Profinet, EtherNet/IP, EtherCAT –- Power Supply Cable, AIDA to flying leads termination 5m (P/N 7Z10458A)
- Data Cable, Ethernet AIDA to RJ-45 5m (P/N 7E01299)
Model: EtherNet/IP-M –
- Power Supply Cable, 7/8” to flying leads termination 2m (P/N 7E01535)
- D9F to D9M Shielded 3m RS232 Cable (P/N 7E11216A) For more detailed information, please refer to the User Manual.
- How long does it take the Helios Pro to cool down and be ready for another shot?Answer
After the Helios Pro reaches the maximum temperature of 60° C (approx. 30 kJ of accumulated energy), it should take about 10-20 3 minutes for it to cool back down to room temperature 3 minutes for it to cool back down to below 60° C so that it will open back up for measurements again, and about 10-20 minutes to cool back down to room temperature to enable full normal usage. These times are of course dependent on ambient conditions. Therefore, use the temperature sensor as the indication of how many pulses can be measured.
- How can I clean the Helios Pro glass window?Answer
Use methanol and a tissue or clean air.
- Does the Helios Pro have an interlock option to avoid damage?Answer
The Helios Pro does not have interlock output support. In all the various data protocols, there is a command to query the current temperature. The customer is responsible for integrating this into the measurement script and coordinating with the laser control to make sure no laser exposure will take place when the temperature is over the limit. If using the PC application, one should select: Options > Log Temperature Enable. This will show the current temperature (and log it). If the temperature goes over the limit, it will turn red.
- Do I need to recalibrate my instrument? How often must it be recalibrated?Answer
Unless otherwise indicated, Ophir sensors and meters should be recalibrated within 18 months after initial purchase, and then once a year after that.
- Can the Helios Pro measure power-from-short-exposure correctly for a pulsed beam, say pulsing at several KHz?Answer
The short answer: Yes. Now to explain: The question comes up because of the concern that the internal fast photodiode - which measures the exposure time (“pulse width”) - might get confused at sensing the end of an individual pulse within a pulsed beam, and incorrectly think that it has now measured the exposure time and needs to divide the measured energy by that time (which would of course be wrong). The Helios Pro is a bit smarter than that though. It looks simultaneously at the outputs from the fast photodiode AND from the (much slower) thermal sensor, and if it sees that the thermal sensor’s output has not “come back down”, then it knows what looked like the “end of the pulse” from the fast photodiode’s output is not really the end of the pulse.
- Can a laser measurement depend on the distance from the laser to the sensor?Answer
In theory, if a beam is completely parallel and fits within the aperture of a sensor, then it should make no difference at all what the distance is. It will be the same number of photons (ignoring absorption by the air, which is negligible except in the UV below 250nm). If, nevertheless, you do see such a distance dependence, there could be one of the following effects happening:
- If you are using a thermal type power sensor, you might actually be measuring heat from the laser itself. When very close to the laser, the thermal sensor might be “feeling” the laser’s own heat. That would not, however, continue to have an effect at more than a few cm distance unless the light source is weak and the heat source is strong.
- Beam geometry – The beam may not be parallel and may be diverging. Often, the lower intensity wings of the beam have greater divergence rate than the main portion of the beam. These may be missing the sensor's aperture as the distance increases. To check that you'd need to use a profiler, or perhaps a BeamTrack PPS (Power/Position/Size) sensor.
- If you are measuring pulse energies with a diffuser-based pyroelectric sensor: Some users find that when they start with the sensor right up close to the laser and move it away, the readings drop sharply (typically by some 6%) over the first few cm. This is likely caused by multiple reflections between the diffuser and the laser device, which at the closest distance might be causing an incorrectly high reading. You should back off from the source by at least some 5cm, more if the beam is not too divergent.
Needless to say, it’s also important to be sure to have a steady setup. A sensor held by hand could easily be moved around involuntarily, which could cause partial or complete missing of the sensor’s aperture at increasing distance, particularly for an invisible beam.
- What is each Helios Pro panel LED indicator for?Answer
There are seven LEDs for different status/error indications. From left to right (and top to bottom), the LEDs are:
- Power
- COM (Green)
- COM (Red)
- Link (Port 1)
- TX/RX (Port 1)
- Link (Port 2)
- TX/RX (Port 2)
For more detailed information, see Chapter 7 of the manual.
- In my system I have the Helios (or the Helios Plus), which is an older generation Helios instrument (it was replaced by the newer Helios Pro). Where can I find its related files (EDS, GDSML, Firmware, etc.…..)?Answer
You can download these files from the Software / Firmware Listing page, at the lower part of the page under “Legacy Software”.
Accessories
Cables
| Compare | Description | Drawings, CAD & Specs | Avail. | Price | ||
|---|---|---|---|---|---|---|
 | 7Z10458APower Supply Cable, AIDA to flying leads termination 5m (1 unit supplied with Helios Pro– Profinet, Helios Pro - EtherNet/IP & Helios Pro – EtherCAT, optional for IPM-COM) | |||||
 | 7E01299Data Cable, Ethernet AIDA to RJ-45 5m (1 unit supplied with Helios Pro– Profinet, Helios Pro - EtherNet/IP & Helios Pro – EtherCAT) | |||||
| 7E01535Power Supply Cable, 7/8” to flying leads termination 2m (1 unit supplied with Helios Pro - EtherNet/IP-M, optional for IPM-COM) | |||||
| 7E11216AD9F to D9M Shielded 3m RS232 Cable (1 unit supplied with Helios Pro - EtherNet/IP-M, optional for the other Helios Pro sensors) | |||||
| 7E01209D9F to D9M Shielded 10m RS232 Cable (Optional for all Helios Pro sensors) | |||||
| 7E11211Data Cable, Ethernet M12 D-coded to RJ-45 plug 3m (Optional for 70K-W, Helios Pro - EtherNet/IP-M and IPM-COM) |
Helios Pro Window Replacement Kit
Kit for replacing the Helios Pro window.
| Compare | Description | Drawings, CAD & Specs | Avail. | Price | ||
|---|---|---|---|---|---|---|
| 7Z08447Window Replacement Kit, Helios Pro |
Extended Warranty for Sensor
Customers that purchase the above items also consider the following items. Ophir-Spiricon meters and sensors include a standard manufacturers warranty for one year. Add a one year Extended Warranty to your meter or sensor, which includes one recalibration.
| Compare | Description | Drawings, CAD & Specs | Avail. | Price | ||
|---|---|---|---|---|---|---|
 | XWAR-SENSORExtended Warranty for Sensor |
Resources
Data Sheets
Drawings & CAD
Helios Pro Drawing(2.6 MB, PDF) Helios Pro EtherNet-IP-M Drawing(2.2 MB, PDF)
Manuals
Helios Pro User Manual(4.5 MB, PDF) Helios Pro User Manual - German (4 MB, PDF)
Technical Notes
Technical Articles
Measuring High Power Lasers Going Digital in Manufacturing e-Mobility and Laser Welding in Automotive Production Laser Measurements in Materials Processing Ophir Power/Energy Meter Calibration Procedure and Traceability/Error Analysis
Application Notes
Software
GSDML.zip - Profinet configuration file(2.4 kB, ZIP) EDS.zip – EtherNet/IP configuration file(17.6 kB, ZIP) ECS.zip – EtherCAT configuration file(2.7 kB, ZIP)